 For Windows 11, 10, 8, 7
How to Convert Horizontal Videos to Vertical
Vertical videos have become extremely popular in general and in social media in particular. But what if you have clips captured in the landscape format you want to share? In this case, you can easily edit them to fit the popular format. Let’s figure out how to make a horizontal video vertical using the best methods available.
There are lots of programs that let you change the orientation of your clips. We’ve tested some of the best options and are ready to show you 5 go-to video editors. You’ll find both free and paid programs in this list, including desktop and online tools. Whatever device you have at hand, you’ll find a suitable program to turn a horizontal video into vertical in a flash.
We’ll show you the editing process step by step. You can run the needed program and follow the instructions straightaway. Let’s get down to converting a horizontal video to vertical right now!
1. How to Make a Horizontal Video Vertical on PC with Clipify
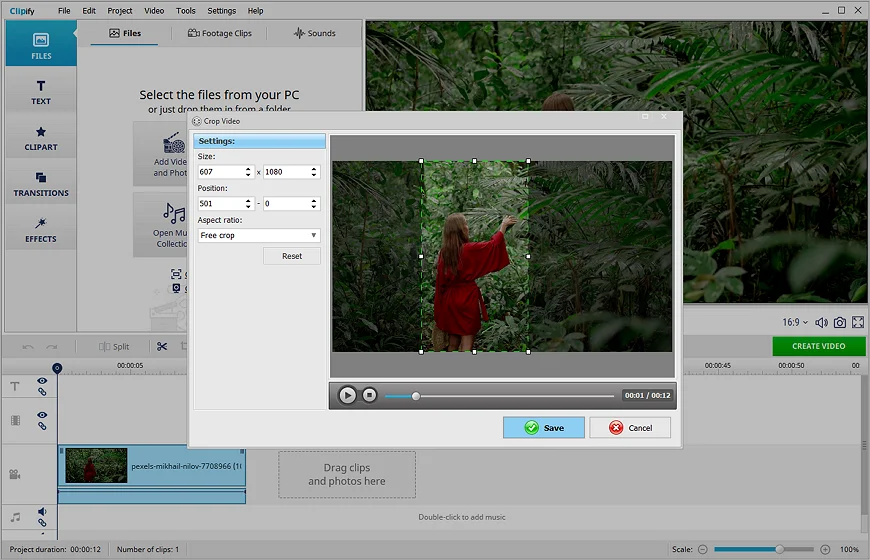
If you want to improve your footage as quickly as possible, try Clipify, automatic video editing software. It offers an intuitive interface suitable for any level of skill. With Clipify, you can effortlessly rotate clips, use the PiP effect, and even replace the backdrop using Chroma Key. Let’s see how you can create a vertical video with this program:
- Use the Crop tool. Select a clip on the timeline and pick the Crop tool. Type in the needed size to crop the horizontal video to vertical. For example, set the size as 607x1080 for a 1920x1080 video to make it 9:16. Move the selection box on the preview window to choose an area to keep. Alternatively, you can rotate your clips by hitting the Rotate button.
- Save the video. Click Create Video. If you want to post your new video on the Internet, choose the needed platform like Instagram or Facebook. You can also save it as a mobile video, DVD, AVI, etc. To avoid black bars, set the frame size that you chose earlier for cropping the clips.
2. How to Convert Horizontal Videos to Vertical Online
There’s a video editing method that lets you edit video files right in your browser - online tools such as Typito. This web-based service has a range of useful features: cutting, merging, resizing, creating an intro, and other functions. Typito won’t provide you with a pro-level video upgrade, but it works well for making small adjustments. However, you need to create an account to export the edited files. If you want to turn your horizontal video into vertical with this program, follow these simple steps:
- Open Typito. Go to the website, hit the Rotate a Video button, and select an aspect ratio: 9x16 or 4x5.
- Upload a clip. Click Add Media and load the file you need to edit. The video will be added to the canvas in the selected aspect ratio.
- Save the video. Click Export to save the new video file.

Do you usually record videos as MP4 and want to edit them without a third-party converter? This guide on how to edit MP4 video files will help you with it.
3. How to Turn a Horizontal Video to Vertical on Mac
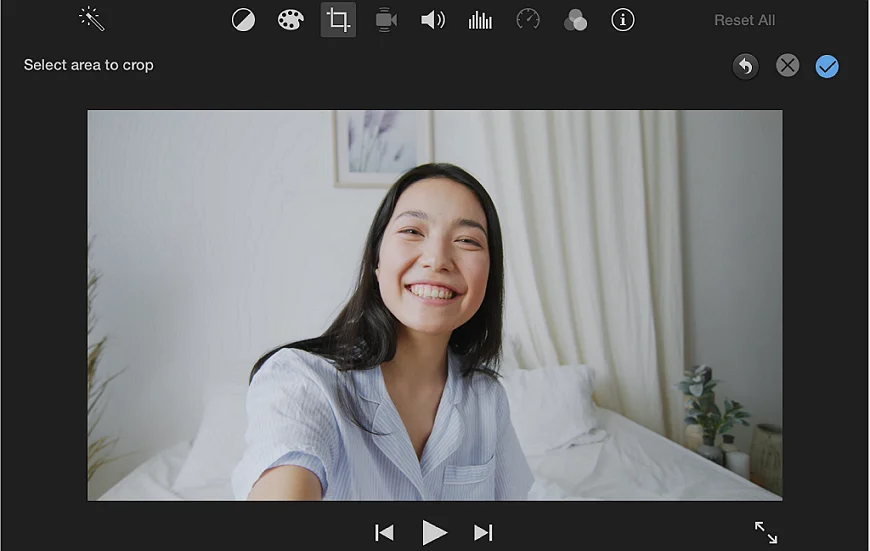
To alter your clips on Mac, you can use a built-in video editor - iMovie. This is a free app available for macOS and iOS devices. It’s widely-used for both basic editing and more advanced adjustments. With iMovie, you can mute a clip, change the background, add a caption, and so on. It also lets you create vertical videos, and here’s how:
- Add a video. Click Import Media, choose a file, and drag and drop it to the timeline.
- Crop the clip. Pick the Crop tool and select the Crop to Fill style. Now, you need to hit Rotate Clockwise and make it fit the subject of the video.
- Export the file. Click the checkmark to save the changes. Then, hit the Share button, choose Export File, click Next, and select Save. Finally, open the edited video file in the macOS Finder and rotate it to fix the orientation.
Need to capture an important video call? Then make sure to learn how to record GoToMeeting sessions with easy-to-use tools.
4. How to Change a Video from Horizontal to Vertical with DaVinci Resolve
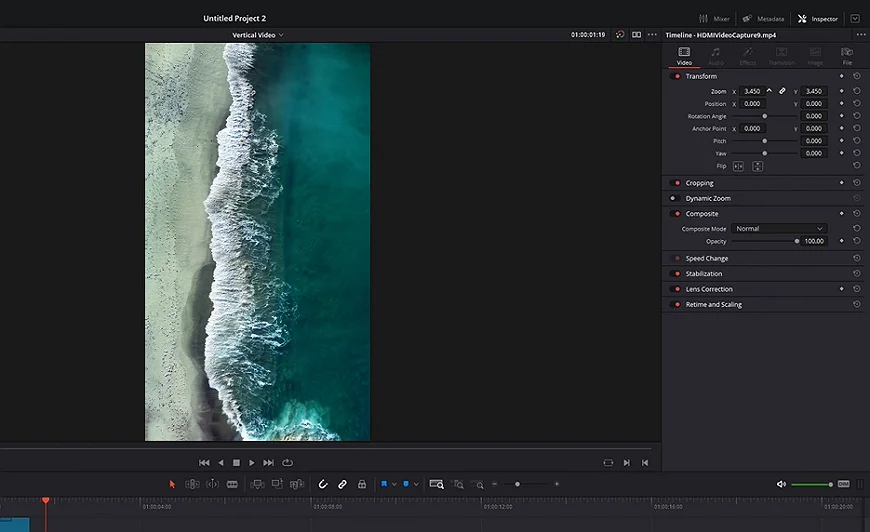
Another way to make changes in your footage on a computer is by using DaVinci Resolve. This is powerful software popular among seasoned users. It has advanced features like image stabilization, camera tracking, motion blur effect, and noise reduction. However, you’ll need to go through a steep learning curve to navigate DaVinci Resolve freely. If you don’t mind that, follow these instructions to change your video from horizontal to vertical:
- Set the right resolution. On the Cut page, select Timeline Resolution, and choose the Portrait option.
- Insert your footage. Drag and drop the needed files or click Media Pool and choose Insert Media.
- Edit the video clips. Click Transform and move the video with your cursor. You can also switch to the Inspector tab and change the X and Y positions.
- Save the video. When done, open the Deliver page, adjust the export settings, click Add to Render Queue, and select Render All.
Wondering how to enhance your footage on a computer with Windows 11? Follow the link to discover the best video editors for Windows 11.
5. How to Crop Horizontal Videos to Vertical with Premiere Pro
One of the most popular video editors used by millions of professionals around the globe is Adobe Premiere Pro. It has an extensive set of tools for adjusting the quality and sound of your footage, correcting colors, creating a video montage, and more. But some users find the editing panels rather confusing, so it might take you some time to navigate quickly. Premiere Pro also has a horizontal to vertical video converter. This is how you can reframe a landscape clip with it:
- Add your video file. Create a new project and load a video file. On the Project panel, right-click the clip and choose New Sequence from Clip.
- Choose an aspect ratio. Open Sequence Settings and select Custom as Editing Mode. Then you can adjust the Frame Size setting as 9:16.
- Adjust the position. Go to Effect Control and open the Motion tab. Now, you need to use the Scale and Position tools to crop the footage.
- Save the file. Click File and select Save As to export the new video.

How to Change a Horizontal Video to Vertical: Summary
To sum things up, there are lots of ways to fix landscape videos. For editing your footage on a PC, you can use the beginner-friendly Clipify or advanced DaVinci Resolve and Premiere Pro. To fix clips on Mac, you should try iMovie. And can you turn a horizontal video vertical online? Yes, Typito can help you with it. So, choose the method you like the most and edit your videos today!