How to Record Webex Meetings?

Capture screencasts with the feature-packed Clipify or explore other recording tools
DownloadDownload Free WindowsFor Windows 11, 10, 8, 7

How to Record a Meeting in Webex - Top 7 Ways

More and more people work and study remotely these days. This is possible mainly thanks to many video conferencing platforms, and Webex Meetings is one of the most popular among them. It is used by many organizations and allows individuals and teams to make online calls, hold virtual events, and collaborate remotely.

But what if you can’t attend a meeting or take notes quickly enough? Then you should find out how to record Webex meetings with screen-capturing tools. Recording Webex events can help people revisit the content and discussions that took place during the meeting. It also ensures everyone accesses the same information and can later share constructive feedback.

A video call in Webex Meetings
Create Webex video recordings

Now, it’s time to discover the top 7 tools, including an official solution and third-party programs for any device you can use to record a Webex meeting. So, let’s jump right in!

1. How to Record a Webex Meeting as a Participant

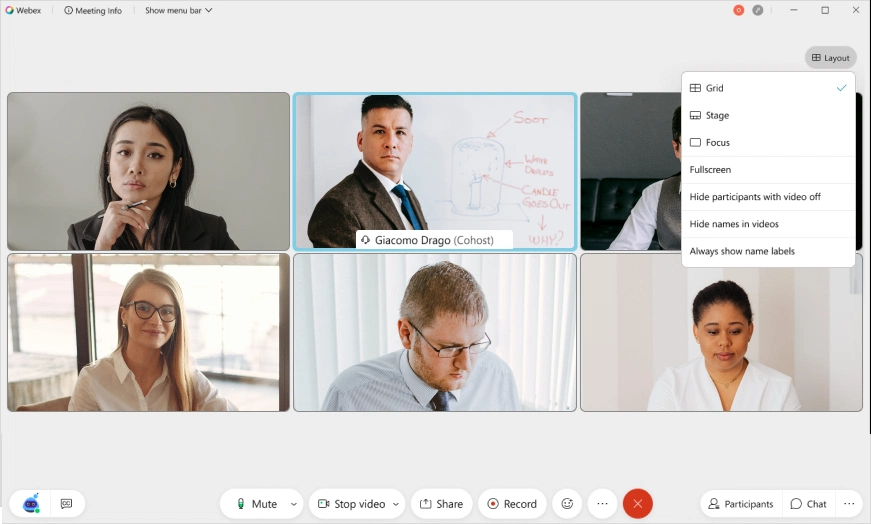
If you’re a host or cohost of the meeting, you can record it within Webex Meetings. This platform offers recording capabilities to save lectures and video calls. If you’re an attendee and don't have access to create a recording but still want to review the information later, jump to the other 6 options described below. Here’s how to capture an event you host with a built-in Webex recorder:

  1. Go to Webex's official website and join the meeting you arrange.
  2. Click the Record button at the bottom of the meeting window.
  3. In the window that pops up, select how you want to save the video — on your computer or to the cloud — and hit Record.
  4. To end the recording, click Stop. The video will be saved in your chosen output format.
Using the capture feature of Webex Meetings
Record an online meeting with a built-in Webex feature

2. How to Record Webex Meetings with Clipify

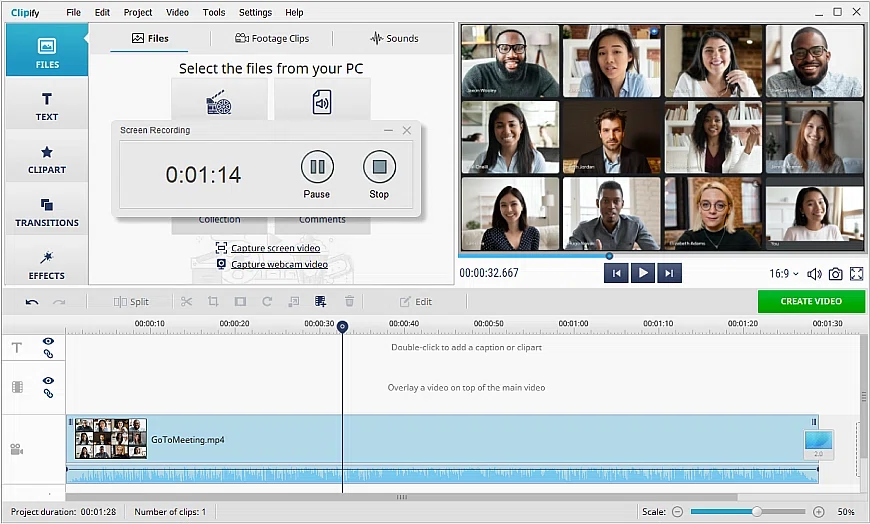
If you’re looking for a free automatic video editor for Windows PC that lets you capture Webex call recordings without any difficulties, check out Clipify. This program allows you to record the screen, voice comments, and webcam both together and separately. Then you can turn the footage into an engaging video right away by trimming and merging clips, adding smooth transitions, overlaying captions and stickers, and typing notes. Here’s how to do it:

  1. Run Clipify after installing it from the official website.
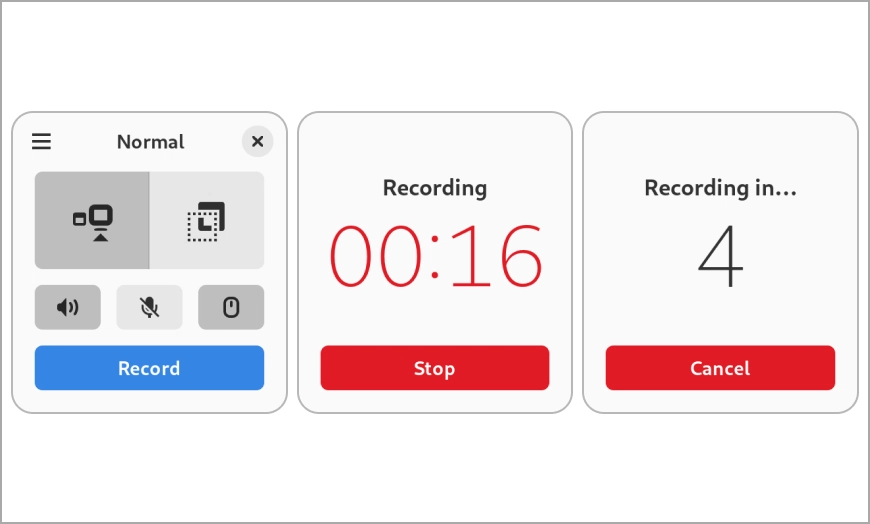
  2. Create a new project and click on Capture Screen Video.
  3. In the window that pops up, adjust the setting and click Start Recording. Here you can choose the desired capture area: full screen, active window, or a custom area. Plus, check what you might also need to record besides a screencast: computer audio, microphone, webcam video, and mouse cursor.
  4. Control the recording with the Pause and Stop buttons. Once you end the recording, it will be automatically transferred into the editor for future processing and saving.
Clipify - a feature-packed Webex recorder
Clipify offers screen, webcam, and voice recording features

Want to enhance your recording? Clipify offers a plethora of handy tools and features, allowing you to brighten dark videos, create a consistent look with 150+ filters, and improve overall footage quality. You can also get rid of black bars on videos, record voiceovers, change backgrounds with Chroma Key, slow down or speed up parts of a video, export in 30+ formats, and more.

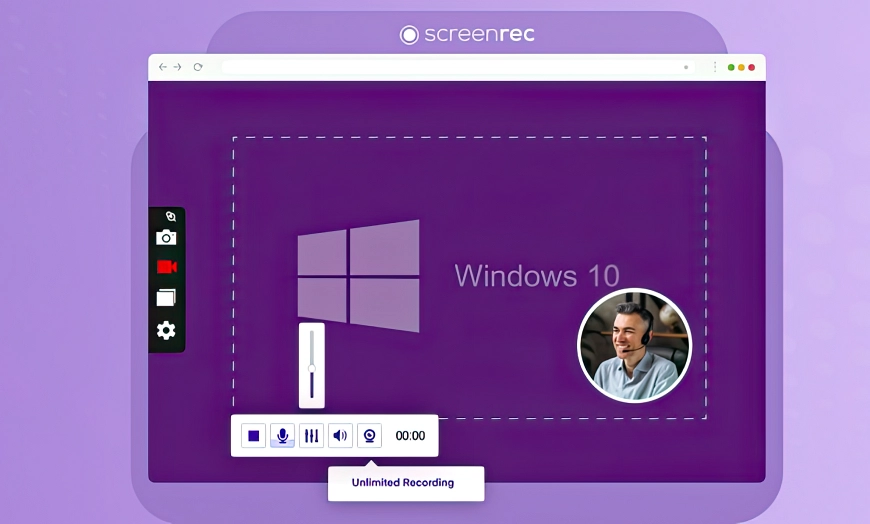
3. How to Record a Webex Meeting with ScreenRec

Need recording software for your Mac? Check out ScreenRec, which lets users make one-click screen captures with a webcam and voice comments. You can also make annotation screenshots with comment bubbles, arrows, and text. This program provides high-quality video and audio output and comes with a convenient library of all your screen captures. The only drawback is that you can’t enhance or edit the footage. To capture a Webex meeting, follow these step-by-step instructions:

  1. After installing ScreenRec on your computer, launch the program and create a new account.
  2. Press command + S to begin and select the capture area with the mouse.
  3. Click the Video Camera button to start recording your screen.
  4. During the recording, you can enable or disable the webcam, microphone, and system audio.
  5. When you’re done, click Stop. Now you can preview the video, download it to your computer, share it via the link, or delete it.
ScreenRec - an all-purpose screen recording tool
Add webcam or voice comments while capturing a Webex meeting
Looking for a Webex screen recorder?
Try Clipify - a user-friendly tool for any video editing needs
DownloadDownload Free WindowsFor Windows 11, 10, 8, 7

4. How to Record a Meeting in Webex on Android

Are you attending a meeting from your Android smartphone? Check out the free app named Loom to capture Webex sessions. It’s a video communication platform that lets you record, watch, react to, and share video clips to speed up your work and stay connected with the team. Though you can’t record the screen and webcam at the same time. Plus, you can’t edit videos and have to create an account to use the app. Let's have a look at the steps below on how to use this Webex video recording tool:

  1. Get the application from Google Play and open it.
  2. Sign up to access the program.
  3. Click Start a Recording. Switch to the Screen tab in the pop-up window and hit the red Record Screen button.
  4. To finish capturing the screen, click Stop. The video will be added to the app library, where you can alter its privacy settings and share it via the link.
Record video call on the go with Loom for Android
Share Webex recordings and collaborate with your team on Loom

5. How to Record Webex Meetings with Audio on iPhone

If you’re an iPhone user, try out Go Record and easily make screen records of Webex meetings. But it’s the only thing that’s available for free. If you want to add face cam reactions, record audio commentary, have no export limitations, and gain access to editing tools, you'll have to buy a lifetime license for $9.99. If you have no issues with these downfalls, let's have a look at how to use this app step by step:

  1. Open the app after downloading it from the App Store.
  2. Hit the Start Recording button.
  3. In the pop-up window, click Start Broadcast to begin capturing your screen. Swipe this window down and watch the Webex meeting as usual.
  4. To end the recording, click Stop Broadcast. The video will be added automatically to the app.
  5. If you have the Pro version, you can trim and rotate the footage, change its speed, and adjust the audio volume.
  6. Save the video to your camera roll, share it via Instagram, or send it by email.
Capture your iPhone screen activity with Go Record
Make Webex recordings on the go with your iPhone

Want to insert your logo to protect the recording? Then this article about how to add a logo to a video will guide you through the whole process.

6. How to Record on Webex with Screencastify Record

If you access a Webex meeting via the Chrome browser, you can use Screencastify Record. It’s a browser extension for screen recording Webex events that also lets you edit the footage and share it in a snap. What’s more, you can add voice narrations, draw notes, overlay text, export as MP4, or save to Google Drive. As for downsides, the free version allows to create only up to 10 videos, no longer than 30 minutes. Here’s how to create a recording of a Webex meeting:

  1. Add an extension to your Chrome browser and sign up using your Google account.
  2. Open the Webex event you want to record.
  3. Go to Screencastify Record, choose the Browser Tab option, and click the blue Record button.
  4. During the recording, you can draw notes with the Pen tool, add stickers, and start a webcam to comment on something.
  5. Once you’ve finished, click Stop. Your footage will be automatically transferred to the editing screen, where you can cut, crop, blur, zoom your video, and add text.
  6. Download your recording as an MP4 file, or share it via Google Drive or Google Classroom.
Screencastify Record – useful screen capture browser plugin
Record a Webex with an extension for Chrome
Searching for a powerful Webex recorder?
Look no further and download Clipify for free!
DownloadDownload Free WindowsFor Windows 11, 10, 8, 7

7. How to Record Meetings in Webex on Linux

If you have a PC running Linux, opt for Kooha. This screen recording software has an intuitive and minimalistic interface, letting users capture screencasts with ease. The only disadvantage is that you’ll have to use an additional editing program to cut unnecessary video parts or add text notes. To capture a Webex screen with this program, follow this quick step-by-step guide:

  1. Launch Kooha after installing it on your Linux PC.
  2. Customize settings such as video quality, audio source, and output format before you start recording.
  3. Select the capture area and click on the red Record button to begin.
  4. Once you stop the recording, the video file will be automatically saved to the specified output folder on your Linux system.
Record important meeting on your Linux with Kooha
Make Webex recordings with ease on Linux

Recording Webex Meetings: Conclusion

These were the 7 solutions to record Webex Meetings. We hope you've already found a few tools that suit your needs. If you still can’t decide what you should choose, let’s quickly recap what we’ve learned.

Can you record a Webex meeting via the official platform? It’s possible only if you host a meeting. How to record a Webex meeting without permission? You can take advantage of the 6 third-party options. For instance, if you’re using a Windows PC and want to edit the recording later, opt for Clipify. iPhone and Android attendees can use the Go Record and Loom apps, respectively. Prefer Chrome browser? Check out the Screencastify Record extension. Linux users can try Kooha software. If you don't mind creating an account to record without time restrictions, test out ScreenRec on your Mac.

To ensure comfortable and uninterrupted recording, it is essential to carefully evaluate the advantages, disadvantages, expenses, and user-friendliness of different methods to choose the one that suits you the most.

About the author: Brought to you by the Clipify team, movie making enthusiasts. We aim to provide you with the most comprehensive tutorials and most useful tips on video editing.
Wondering how to record Webex meetings?
Just get feature-packed and intuitive Clipify now!
DownloadDownload Free WindowsFor Windows 11, 10, 8, 7