How to Voice Over a Video?

Do that with the free Clipify or explore 5 other easy ways
DownloadDownload Free WindowsFor Windows 11, 10, 8, 7

How to Add a Voice Over to a Video in 2024

Are you a professional videographer or an amateur who often makes videos for the Internet? In any case, if you add a voiceover to your video, you will make the information in the clip accessible to a larger audience. Besides, you don’t have to be a voice actor or a video montaging genius to make a pleasant audio recording and accompany your video with it. We will show you handy programs with built-in sound tools, which will help you do that.

Stay with us, and you will learn how to voice over a video using any of your devices - an iOS or Android smartphone, a Windows PC, a Mac computer, or an iPad. You will also discover a few tips and tricks for making a perfect voice over outside a professional sound recording studio.

Recommendations for Adding Voiceovers to Videos

The video sound plays an important part in setting the overall impression of your video on your audience. So even though you are not required to be a professional to voice over your video tutorials, there are still some guidelines we suggest you follow. Let’s check them out:

  • Write a voice over script Compose the text for your voice over and practice reading it before you record, so that your words sound more convincing. Make sure that what you say matches the actions in your video. Keep an eye on the timing and prevent your script from being too long or too short.
  • Keep a clear voice and still tone Make sure your voice is loud enough, and watch your pronunciation. Stick to a single neutral tone throughout the whole video.
  • Speak at a moderate pace Don’t try to cram a long script into a short video. Instead of increasing your speaking pace, try rephrasing, simplifying your sentence structures, and crossing off unnecessary information.
  • Find a quiet environment Arrange an appropriate surrounding without distractions and background noises. Purchase a good-quality dynamic microphone and a pop filter if you plan to record many voice overs in the future. This buy will be a worthy investment.
  • Get a perfect voice over program Go with a video editor that will let you do both - to record your voice and add it to your clip. Make sure the editor suits your skill level so you feel comfortable using it as you make your explanatory videos.

Hopefully, you found our tips helpful and now feel prepared to record your voice. If so, let’s find the best program for the task and see how to make a voice over video with its help.

Way 1. Create Videos with Voice Over Using Clipify

Clipify is a video editor with a handy voice over tool. With its help, you can easily record your voice, edit the recording, and add it to your video. The program has an intuitive interface and is available for free on PCs with operating systems from Windows 7 to 11. This program features the fundamental video editing tools - for rotating, reframing, cropping, and enhancing clips. But it also has a set of easily applicable professional features. That means that Clipify would come in handy for people of different professions, ages, and skill levels. Check out the steps to be better acquainted with the program itself and its sound editor.

Step 1. Install Clipify on Your PC

Hit Download to load the Clipify installer in your browser. Then follow the lead of the wizard to unpack the editor on your computer. Start Clipify and begin from a blank project in it.

DownloadDownload Free WindowsFor Windows 11, 10, 8, 7

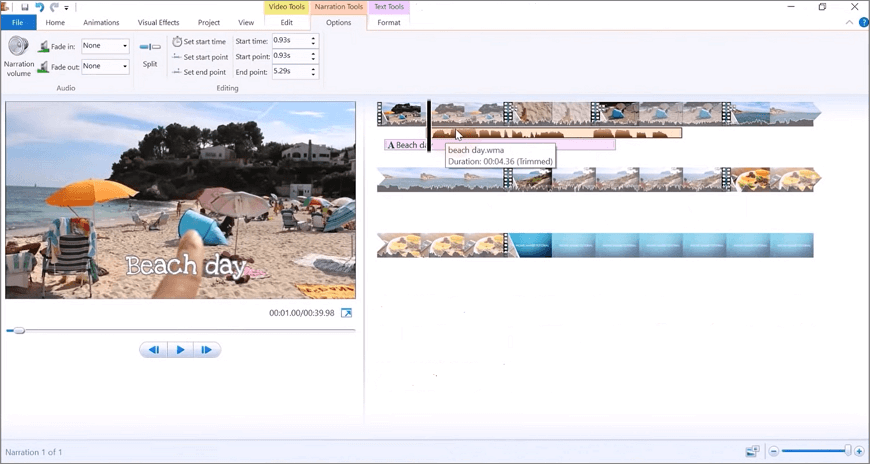
Step 2. Add Narration to Your Video

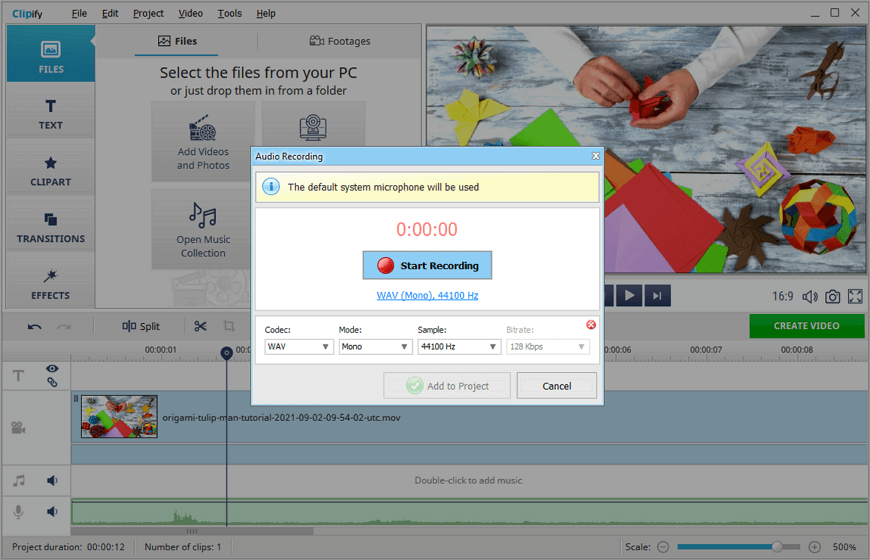
Choose the Add Videos and Photos option to open your video recording. Double-click the voice over timeline at the bottom to open the Audio Recording tool. Adjust its settings: codec, mode, sample, and bitrate to the needed values or go with the default ones. Alternatively, add audio from your library by double-clicking the audio timetable in the middle.

Use Clipify's audio recorder to voice over your video
Open your video tutorial and record an audio for it

Step 3. Adjust the Sound Settings

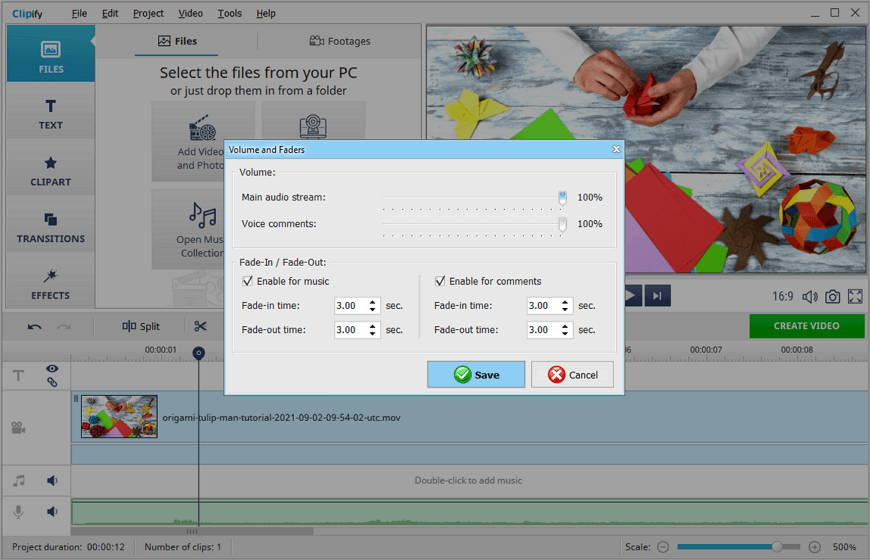
Right-click your recording on the timeline and pick the Volume and Faders option. On the menu that pops up, give your recording a fade-in and fade-out and fix the audio stream to make your video sound better. Additionally, you can use the timeline toolbar to cut or split your soundtrack.

Edit the sound in your video tutorial
Adjust the setting of your audio recording

Step 4. Save Your Narrative Video

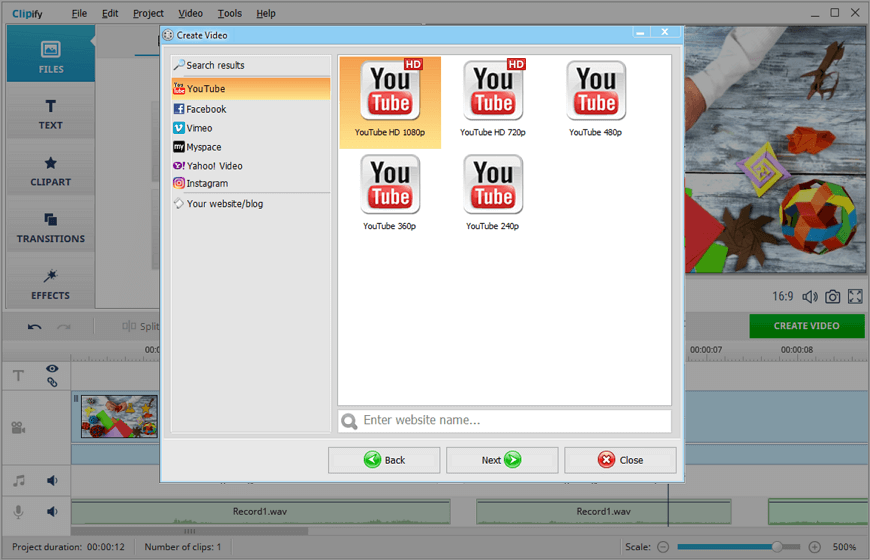
Does your video voice over meet your expectations? Then hit Create Video to prepare your clip for export. Pick the format you want to save it in. We advise you to go with the universal MP4. This format preserves the best quality, yet it takes up little memory space on your PC and is suitable for sharing online. Alternatively, you can choose one of Clipify’s video presets for popular video hosters and social media like Vimeo, YouTube, Facebook, Instagram, Myspace.

Export your tutorial in the preferred format
Save your video for sharing it online

After you accompany your clip with a vocal narration, there is more you can do within this editor to polish your video before posting. For instance, you can speed up or slow down a video to make it more comprehensive. You can also remove black borders from your video, color correct it, replace its background, or decorate your clip with captions and stickers to make it more playful. Skilled video editing aficionados will enjoy using the instant quality fix feature and video stabilization along with other one-click options.

Need to add a voiceover to your video tutorial?
Do that and much more with the easy Clipify!
DownloadDownload Free WindowsFor Windows 11, 10, 8, 7

Way 2. Voice Over a Video in Windows Movie Maker

Windows Movie Maker is voice over video software that came with the Windows package. However, since Jan. 10, 2017, this software is no longer supported. So if you are using a new PC, you probably don’t have this editor. Microsoft has replaced it with a new application you can download from the Microsoft Store. However, it offers very little for free. The previous version is a handful of tools for touching up your clips and making fun voice overs for amateur videos. If you are using an old computer and haven’t updated it to Windows 10, check out how to create a voice over video with Windows Movie Maker:

  1. Open Your Video Recording Run Windows Movie Maker. Click on the main screen to import a video file from your library.
  2. Record Your Voice Over On the Home tab, choose Record Narration, click Record, and start speaking. Once you have narrated the whole script, stop recording. Save your narration to file, and it will appear in the program. Alternatively, you can accompany your clip with a pre-recorded soundtrack.
  3. Save Your Narrative Video Switch to the Files tab to save your edited clip. Or instead, share it on YouTube, Vimeo, or other platforms on the Home tab.
Use Windows Movie Maker to add audio narration to your video
Narrate your vacation video using Windows Movie Maker

Are you about to have an important Zoom call? Then make sure to read this article about how to record Zoom meetings without permission to find 5 easy ways to do it.

Way 3. Make a Voice Over Video in the iMovie App

Are you a Mac user who doesn’t want any extra programs on their device but still needs good video editing software for voiceovers? Go with iMovie. You would be surprised, but this program has a handy voice recording tool, which could help even pros with YouTube video voice overs. What's more, the video editor has a diversity of easy-to-use features, which will help you to perfect your clip pretty quickly. Let’s see how to add voice over to a video in iMovie.

  1. Import Your Media Open the app and click Create New > Movie to start a blank project. Drag all the needed files from the Media page onto the timeline for your voice over.
  2. Record an Audio Over Your Video Hit the microphone at the bottom left of the preview window. Adjust the settings - select your active microphone, fix its input, and mute the video background to cancel any noise. Click the red button to start recording and click it again to finish.
  3. Position Your Audio Recording Drag your soundtrack to the needed spot on the timeline, crop it and add fade-ins and -outs by pulling the sides. Left-click the parts of the recording to add audio points. Right-click the track to apply other modifications like splitting and deleting fragments.
  4. Export Your Narrative Clip Click the export button in the top right corner of the preview window and save the video on your Mac computer.
Use a built-in application for Mac to narrate your clip
Make a professional video with a voice over in iMovie

Want to give your video recording a little glow-up before adding your comments? Learn how to enhance a video for a better impression on your audience.

Way 4. Add Voice Recording to Video in Kapwing

Don’t have much space on your computer or smartphone, yet you want a powerful video maker with a voice over tool? Try Kapwing, an online video editor jam-packed with all kinds of features for enhancing and decorating clips, montaging tutorials, and movies. When it comes to recording audio, the editor makes this task uncomplicated and offers special waveform animation you could use for social media videos. Let’s dive into the process and see the details:

  1. Open Your Video in Kapwing Go to the Kapwing official website and pick the Start Editing option to open the editor. Click on the startup screen to upload your media.
  2. Record Your Commentary Switch to the Audio tab. Here you can either import a voice recording from your PC library or make one from scratch. Just click Record to open the tool, pick your microphone from the dropdown list, and hit the red button. Click the red button again to stop recording, and the editor will automatically drop your soundtrack onto the timeline.
  3. Edit Your Soundtrack Select your voice over track on the timeline and set its speed and volume on the Edit menu. Drag your soundtrack to the needed moment on the timeline or use the Timing tab for better control. Add fade-in and fade-outs on the effects tab. Split and trim your soundtrack.
  4. Save Your Video with a Voice Over Click the Export Video button to save your video with comments as an MP4. You will have to log into the Kapwing platform to export your clip without a watermark unless it’s longer than 5 minutes. If so, you will have to buy a subscription to save it.
Voice over videos for social media online
Record a voice over for your workout video with Kapwing

Way 5. Put Your Voice Over a Video on Your iPhone

Do you mostly post your videos on Instagram, Snapchat, and other social media? Like editing your visual content with your Apple smartphone? Here is an idea: use a video editor for iOS to voice over your clips. The application allows accompanying videos with melodies from its collection and iTunes Music or recording your voice. Then, you can set the speed, volume, and faders of the video and even trim it if needed. The application is free to download. But to access all its features, you have to make a one-time purchase. There is a version of this app for iPad users as well. Check out the tutorial to learn how the app works:

  1. Upload Your Video for Editing Download the application from the App Store to your device. Go to Gallery to choose the video you would like to edit.
  2. Accompany Your Video with Audio Tap Add Music > Record Audio and the microphone icon to start recording. Stop recording and tap Done. Your audio will appear on the timeline in an instant.
  3. Adjust the Sound of Your Video Move the audio recording to the needed moment on the timeline using your fingertip. Fix the volume of the soundtrack with the slider at the bottom. Tap on the recording to access the Audio Trim tool and Sound Settings menu. Here you can add faders and loops to your audio.
  4. Save Your Clip with a Voice Over Once your video sounds as you intended, tap the export icon in the top right corner of the interface to generate your clip. It will be saved with a watermark unless you subscribe.
Voice over videos on the go using your iPhone or iPad
Add an audio recording to your clip in an iOS app
Need a reliable voiceover app for your PC?
Get Clipify and make excellent narrative videos!
DownloadDownload Free WindowsFor Windows 11, 10, 8, 7

Way 6. Add Voice Over to Video With Your Android

Not an iPhone user? Try the VoiceOver app for Android. This editor was designed for singers and amateur users who want to edit their voice recordings, create soundtracks and add them to GIFs, or create fun ringtones. The application has a customizable sound recording tool, useful audio filters (Echo, Equalizer, AutoTune, Gain), amusing sound effects (Chipmunk, Batman, Robot), a library of theme music, and short sounds (cheers, claps, applause). Besides, it supports cloud storages - Google Drive, Evernote, and Dropbox. However, the VoiceOver app won’t let you add your sound to a clip. You would have to use some other video app for that. Dive into the tutorial to learn what this app has to offer.

  1. Adjust the Sound and Record Download the app from Google Play and open it. Find the Recorder tool. Change its setting to the appropriate ones: audio quality, volume, audio format. You can also use the built-in Audio Stop Countdown timer if you want the recording to be of a specific duration. Tap the red button of the tool to start recording. Pause your recording when needed. Once through your script, stop the audio input.
  2. Improve Your Audio Move on to editing your voice recording. Drag the playhead to the specific moments on the track where you want to cut, trim, or mute it. Employ effects and filters to convey a certain mood or achieve the desired sounding. Want to add a second voice or a background soundtrack to the recording? Do that with the editor’s Overdub tool.
  3. Save Your Composition Once you finish editing your voice over track, hit Save and type in the name of your recording. Tap Save again, review the media information and hit Done. Now you have a professional-level voice recording you can add to any video you like. But you would have to use an alternative editor for that.
Create a soundtrack for a video with a pocket audio editor
Record a high-quality audio for your video tutorial on Android

Voice Over Video Editing: Final Words

You no longer need to worry about how to voice over a video since you’ve learned 6 reliable ways to do so. Just choose the most suitable one for you personally. Haven’t made up your mind yet? We recommend you try the all-in-one Clipify. You can get this editor for free and try its capabilities with no regret. If you have access to multiple devices, give other editors a chance as well. Fortunately, each of them has a free trial. We hope you end up with a perfect match.

About the author: Brought to you by the Clipify team, movie making enthusiasts. We aim to provide you with the most comprehensive tutorials and most useful tips on video editing.
Want to add a voiceover to your video tutorial?
Do that and much more in the free Clipify!
DownloadDownload Free WindowsFor Windows 11, 10, 8, 7