How to Change the Aspect Ratio of a Video:
Complete Walkthrough
The aspect ratio of your video is an important thing to consider if you are planning to share this video - whether online or on your home TV. If the aspect ratio of your clip is different from that of the screen, then the video on the show will be automatically resized or get black bars along the sides. This usually makes a clip look awkward or less satisfying to watch. Fortunately, you can avoid such a thing with an aspect ratio changer in video post-production.
In this guide, we will dive deeper into what an aspect ratio is and which types of it are most common nowadays. You will also learn an easy way to change the aspect ratio of your video in Clipify software free of charge. This automatic video editor has every tool for thorough post-production. You will feel comfortable using it and get a high-quality result even if you are a complete beginner. In case you prefer using your Mac or iPhone to fix the aspect ratio of your video, there will be options for you as well. Let’s get started.
Aspect Ratio of a Video: Definition and Types
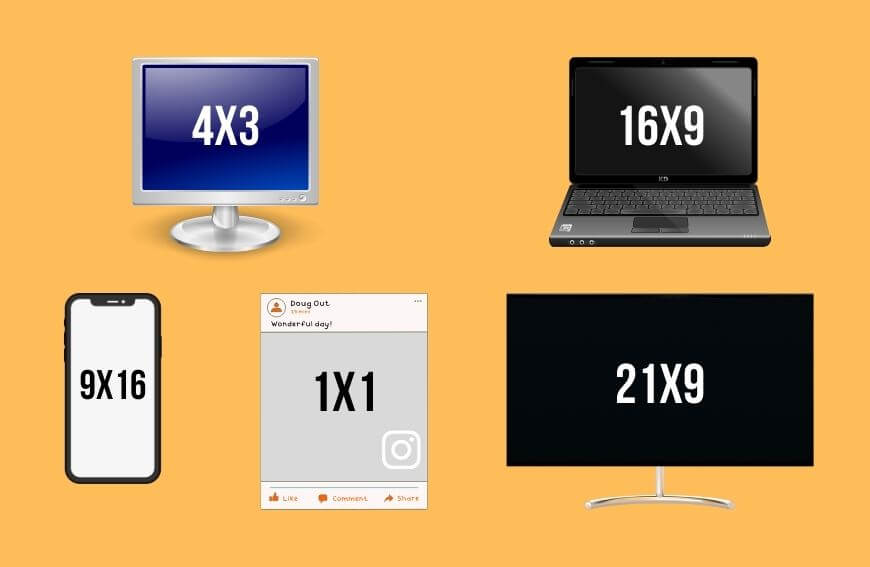
Let’s begin with clearing up what an aspect ratio is. It is the proportion of the video's width to its height (width : height) that also defines its orientation. The aspect ratio digits don’t mean the actual size of the video in centimeters, pixels, or inches. It’s the reduced proportion that matters. To give you an example - videos with sizes 1280 x 720px and 1920 x 1080px have the same aspect ratio, which is 16:9. Before we move on to the tutorial, check out the ratio types that are popular today and where they are used:

- 4:3This screen aspect ratio was common for standard computers and TVs before wider monitors appeared on the market. Although not as popular as before, screens with this aspect ratio are still commonly used.
- 16:9Today, this is the most popular aspect ratio. The majority of video hosting and streaming services have a 16:9 ratio - YouTube, Vimeo, etc. Besides, most devices are equipped for shooting videos of this ratio. It will be perfect for clips you plan to rewatch on a new generation TV or PC.
- 9:16Such an aspect ratio is the vertical version of the previous one. It is the standard for clips recorded with your smartphone. Clips with this format are called tall videos and are most common for Insta stories and Reels, Snapchat videos, Facebook stories and similar features in other social media apps.
- 1:1Such a proportion defines square videos. These are popular for Instagram and Facebook posts. However, other than that, this aspect ratio is not widespread.
- 21:9This is the latest aspect ratio in the industry. It creates an illusion of a 360-degree view. A format of this kind is called cinematic widescreen. You can find it in cinema theaters and interactive museums.
Now that we have defined what an aspect ratio is and gone over the most common types, it’s time to learn how to adjust the aspect ratio of your clip by yourself. Skip to the step-by-step tutorial below and see a quick and easy way to do so.
How to Change the Aspect Ratio of Your Video for Free
Fixing the frame of your video is not difficult at all if you use Clipify. It will only take 4 steps. Besides, with this video software, you will be able to preserve the best quality of your video. So hesitate no longer and skip to the guide:
Step 1. Equip Yourself with Clipify
Hit the button below to get the Clipify aspect ratio changer. Follow the guidelines of the installation wizard to get the program on your desktop and run it.
Step 2. Open Your Video in the Editor
When on Clipify’s startup menu, click New Project and Blank Project to get started with editing a new video. Stay on the Files tab of the program and choose Add Videos and Photos. Find the file with your clip and open it. Your video track will instantly appear on the timeline.

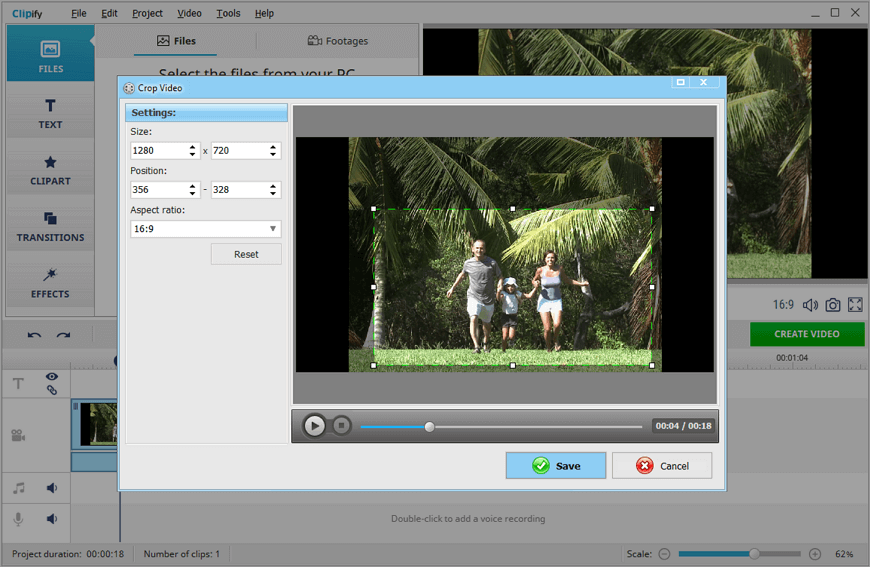
Step 3. Change the Aspect Ratio of Your Video
Click the video track and choose Crop on the toolbar. Here you can either choose an aspect ratio preset from the drop-down menu or apply custom cropping settings by typing in the desired size in pixels.

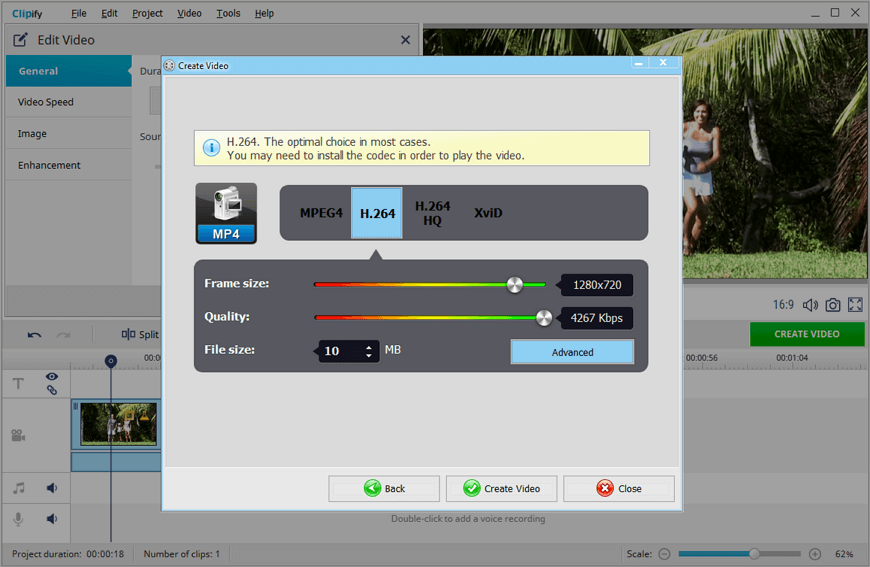
Step 4. Save Your Edited Clip in the Desired Format
If the video looks ready for posting, click Create Video to generate it. On the menu that pops up, you can choose the format you want to save your video in. If you plan to post it online, we recommend going with an MP4. Alternatively, you can burn your clip to a DVD with a custom menu, convert it for rewatching on your mobile device or TV, or choose one of the other 30+ options that this aspect ratio converter for videos offers.

Feel that your clip could use some more editing? With Clipify you can perform a diversity of tasks other than changing the aspect ratio of a video: join video clips, improve the quality and contrast of your footage, jazz up your clip with captions and stickers, zoom in a video and adjust its speed, accompany a video clip with in-program music or your own voice comments. With this handy post-production program, you can even do professional tricks: stabilize shaky videos taken outdoors, color correct your videos with the Curves, and more.
Curious to know what else this powerful editor can do for you? Learn more about the capabilities of Clipify in the video review below.
Excited to try the video enhancer yourself? Download it for free today and make engaging content for your personal YouTube channel or a sweet surprise for a family gathering.
 Clip
Clip
