How to Edit GoPro Videos on Windows: 7 Cool Ways
There are as many video editing tricks as there are stunts you can pull on a snowboard. So, if you want to share the adventures captured by your GoPro in the best way possible, it’s best to learn how to edit GoPro videos on a PC. GoPro footage has a pair of issues, though. One – the cameras produce only MP4 and HEVC video files. And two – the official video editing software by GoPro is no longer supported. Below, we'll take a look at a decent alternative, named Clipify.
Clipify is a free video editor available for Windows 7, 8, 10, and 11. It provides one of the best ways to edit GoPro videos on a computer. There are all the tools you need for basic editing, like filters and effects, along with some advanced features, such as stabilization, color grading, sound processing, and more. With Clipify you can make your video chronicle breathtaking!
In this guide, we will show how to edit GoPro videos on a PC using features of Clipify. You will learn how to do 7 particular editing tricks to make dynamic and vivid videos. Along with that, we will take a look at some Clipify alternatives to broaden the scope.
Let’s get rolling, shall we? Hit the button below to get the Clipify installation file and then run it.
Follow the instructions, and as soon as the installation is complete, you are ready to start.
Way 1. Auto Edit a GoPro Video
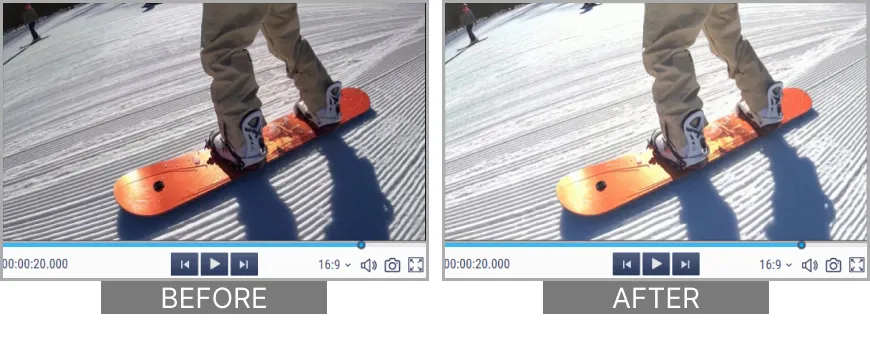
You have already done all the hard work with your camera. Now upload your footage to a Windows PC and let Clipify handle the rest. In a single click the program will improve the light, color, and overall look of your clip. Here’s how to edit GoPro videos on a PC with this feature:
- Launch Clipify. Get your free copy of Clipify on your PC and run it.
- Open your footage. Click Add Videos and Photos and navigate to your clip via the file browser. Alternatively, you can drag a file directly to the timeline from anywhere.
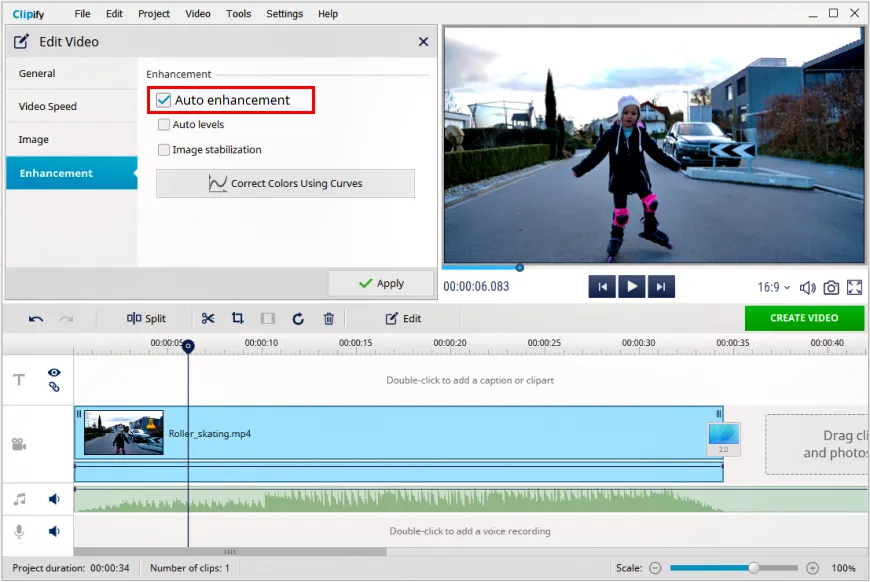
- Run the Auto Enhancement. Click the Edit button, open the Enhancement tab and check the Auto Enhancement box. You will see the changes in the preview window. If you are happy with the result, click Apply.
Way 2. Add and Edit Sound
Remember to pay attention to the sound of your footage while editing GoPro videos on Windows. Want to add more energy with a groovy music track? Easy-peasy! Clipify offers an extensive library of music for any occasion. If your computer has a microphone, you can also add a voice-over to your video. Here’s what you can do with the sound:
- Adjust the original sound. Select a clip on the timeline. Click the Edit button and move the Volume slider in the General tab. Or click the Mute button to silence the clip completely.
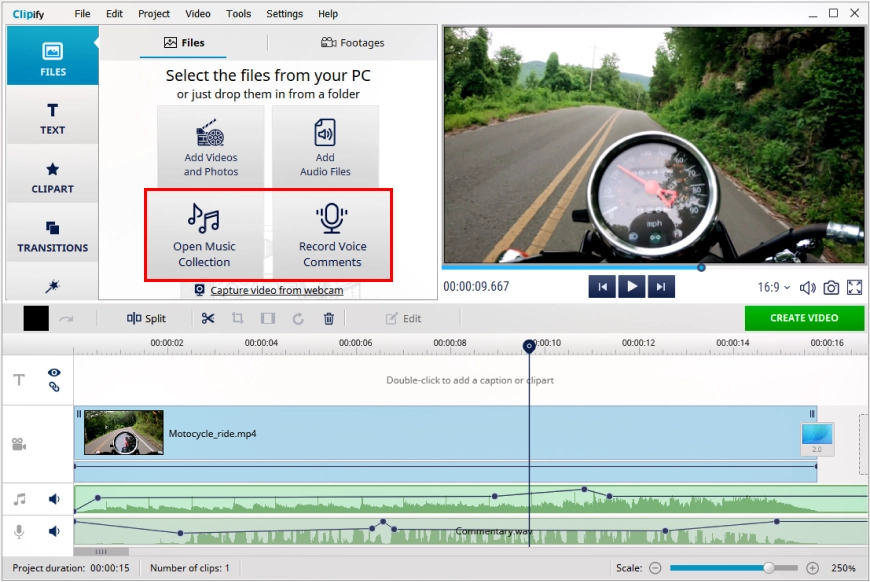
- Add some music. Go to the Files tab and click Open Music Collection. Then find a track that matches your clip and click Add to Project. You can also click Add Audio File and import music from your PC.
- Edit the sound track. Right-click the audio track to access trimming, fading, volume adjustment, and other settings.
Is the sound in your footage too quiet? Learn how to increase the volume of a video using a beginner-friendly video editor where you can adjust the sound in an instant.
Way 3. Stabilize Your Footage
Taking clean and steady shots while riding down a mountain slope is very difficult. But in a lot of cases, the footage can be stabilized in post. And Clipify is equipped with the needed feature:
- Upload shaky footage. Add a clip to the timeline, either by dragging it into the program window or clicking the Add Videos and Photos button and using the file browser.
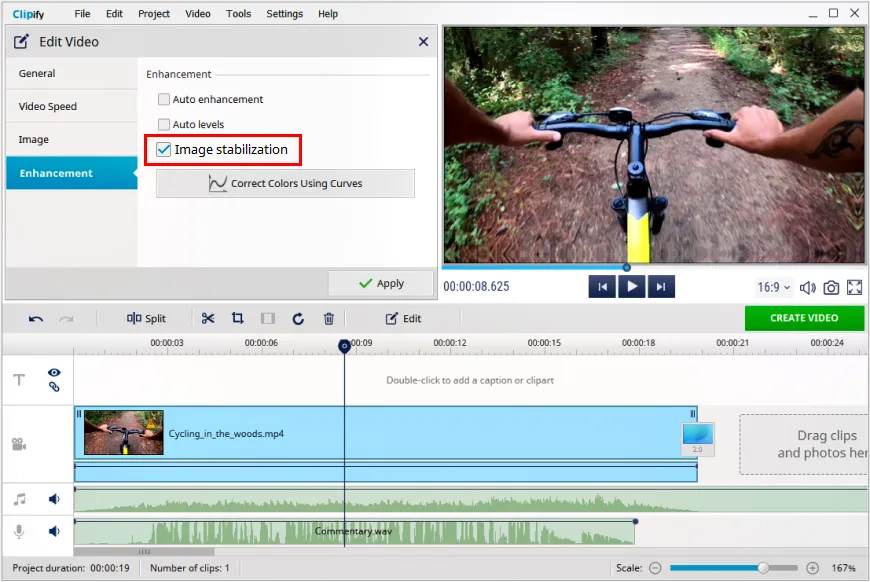
- Apply stabilization. Select the clip on the timeline, click the Edit button, and go to the Enhancement tab. Then check the Image Stabilization box and click Apply.
Way 4. Try Editing GoPro Videos into One
To keep your montage full of dynamics, you better keep the boring bits out. Or you can add pieces of other footage, to keep things interesting. Learn more from a more in-depth guide on how to remove unwanted parts of a video. Here are some easy things you can do right now:
- Trim your clip. Select the clip on the timeline, then click Edit on the toolbar and select Cut and Set Duration on the General tab. Get the part of the clip you want to keep between the blue markers, or enter the precise beginning and ending time values. Then click Apply.
- Split the clip in two. Back at the timeline, you can split a clip into two. To do so, move the play head to the moment where you want to cut and use the Split tool. You can freely shuffle and delete the cut bits.
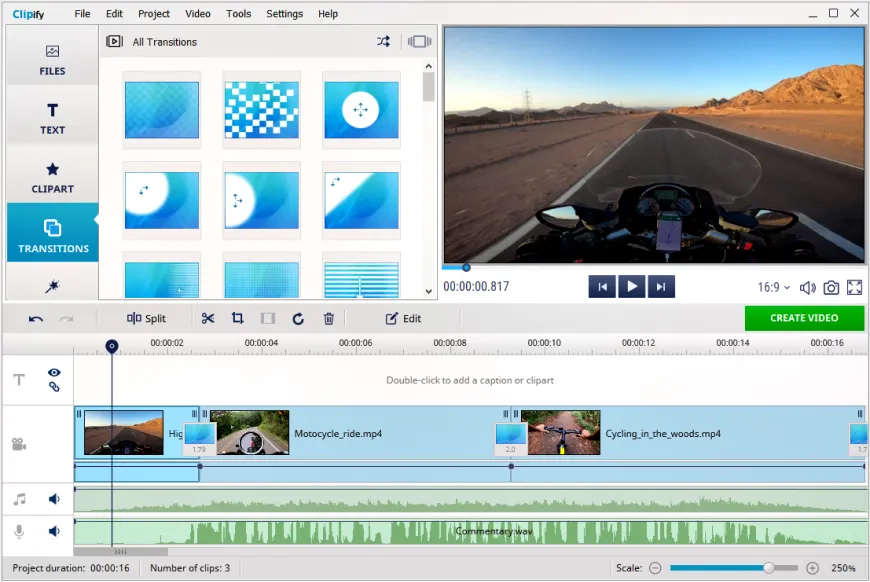
- Move the clips around. Play with the arrangement of your clips, make them flow into one another smoothly and match the music. Experiment with transitions to make the video smoother.
 Clip
Clip